


확장된 Nextcloud 환경에 있는 경우 Nextcloud 업데이트는 무엇보다도 웹 서버와 웹 서버 디렉토리를 동기화 상태로 유지해야 하기 때문에 훨씬 더 많은 시간이 소요되고 복잡합니다.
앱 업데이트와 Nextcloud 업그레이드 모두에 대한 운영 비용과 위험을 영구적으로 최소화하기 위해 lsyncd를 사용하여 웹 서버의 자동 동기화를 사용합니다.
이 예에서는 두 개의 웹 서버를 가정합니다.
Webserver #1: 192.168.2.251
Webserver #2: 192.168.2.252
이 예시 IP 주소를 시스템에 맞게 조정하십시오.
목차
1. NFS (am Webserver #2) 192.168.2.252
2. lsyncd (am Webserver #1) 192.168.2.251
웹 서버 #2에 로그인하고 권한 모드로 전환:
sudo -s1. NFS (Webserver #2) 192.168.2.252
시작하려면 웹 서버 #2에서 동기화(lsyncd)를 위해 NFS 서버 서비스를 설정합니다.
apt install -y nfs-kernel-serverNFS 공유 생성
nano /etc/exports환경에 맞게 IP 주소를 조정합니다. 이 예에서 IP 주소 192.168.2.251은 첫 번째 웹 서버의 IP 주소에 해당합니다.
# /etc/exports: the access control list for filesystems which may be exported
#               to NFS clients.  See exports(5).
#
# Example for NFSv2 and NFSv3:
# /srv/homes       hostname1(rw,sync,no_subtree_check) hostname2(ro,sync,no_subtree_check)
#
# Example for NFSv4:
# /srv/nfs4        gss/krb5i(rw,sync,fsid=0,crossmnt,no_subtree_check)
# /srv/nfs4/homes  gss/krb5i(rw,sync,no_subtree_check)
#

/home/www/nextcloud 192.168.2.251(rw,sync,anonuid=33,anongid=33,no_subtree_check,no_root_squash)ufw allow from 192.168.2.251 to any app samba4 comment "NFS-Freigabe"samba4를 사용할 수 없는 경우 ufw 응용 프로그램/구성을 만듭니다
nano /etc/ufw/applications.d/samba4다음 내용을 붙여넣습니다.
[Samba4]
title=Samba 4
description=Samba 4 as domain controller
ports=53|88|135/tcp|137/udp|138/udp|139/tcp|389|445/tcp|464|636/tcp|1024:5000/tcp|3268/tcp|3269/tcp|5353
다음 명령을 반복하여 방화벽 규칙을 확장합니다.
systemctl restart ufw.service && ufw allow from 192.168.2.251 to any app samba4 comment "NFS-Freigabe"마지막으로 NFS 공유를 게시합니다.
exportfs -av
따라서 NFS 서버와 필요한 공유가 lsyncd에 대해 설정되었습니다. 이제 기본 웹 서버로 전환하고 lsyncd를 설치합니다.
2. LSYNCD (Webserver #1) 192.168.2.251
웹 서버 #1에 로그인하고 권한 모드로 전환:
sudo -s웹 서버 #1에 필요한 소프트웨어 lsyncd 및 nfs-common을 설치합니다.
apt install -y lsyncd nfs-common그런 다음 필요한 폴더를 만듭니다.
mkdir -p /etc/lsyncd/ /home/www/lsyncd보조 서버를 첫 번째 서버와 동기화된 상태로 유지하기 위해 lsyncd 구성을 만듭니다.
nano /etc/lsyncd/lsyncd.conf.luasettings{
logfile="/var/log/lsyncd.log",
statusFile="/var/log/lsyncd.stat",
statusInterval=1,
}
sync{
default.rsync,
source="/home/www/nextcloud",
target="/home/www/lsyncd",
delay=0,
rsync = {
verbose = true,
owner = true,
group = true,
perms = true,
update = false,
chmod = 750,
chown = "www-data:www-data"
}
}이제 시스템에서 보조 웹 서버의 NFS 공유를 영구적으로 마운트합니다(웹 서버 #1):
nano /etc/fstab다음 줄을 추가하고 웹 서버 #2(192.168.2.252)의 IP를 시스템에 맞게 조정합니다.
[...]
192.168.2.252:/home/www/nextcloud /home/www/lsyncd nfs4 nfsvers=4,minorversion=1,noatime,nolock,sec=sys 0 0
웹 서버 #2의 릴리스를 웹 서버 #1의 /lsyncd에 통합하려면 한 번 호출하십시오.
mount -a -vv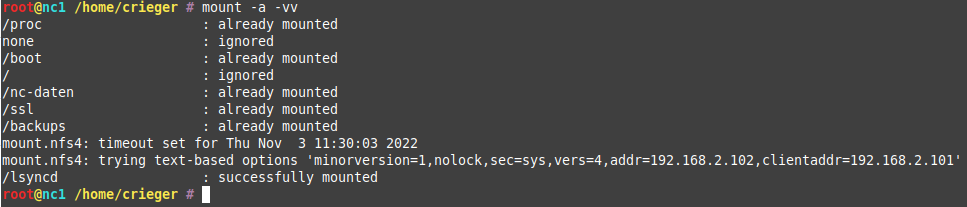
에. 성공적인 통합은 ‘성공적으로 마운트됨’으로 확인됩니다.
이제 lsyncd 서비스를 활성화하고 시작하십시오.
systemctl enable lsyncd.service && systemctl restart lsyncd.service그리고 로그 파일을 확인합니다.
tail -f /var/log/lsyncd.log
[root@vz ~]# sysctl -w fs.inotify.max_user_watches=600000 >> /etc/sysctl.conf
Lsyncd fails with Out of inotify Watches Error
Following from a previous article where I demonstrated how to synchronise data to a remote host using lsyncd, this one with show how to deal with the below problem I faced.
The problem I faced was, although lsyncd has started successfully, the synchronisation had not begun. In the previous article, I created a directory and some files to test the sync – and this worked. However, when I tried to copy some data for real – 500G odd – the sync did not happen.
After checking the log file:
…I found the following error:
Fortunately this problem is easy to solve – we just need to increase a kernel-based limitation. I believe one inotify watch is required per file/directory and they use about 1kB each for a 64 bit system. The variable we need to alter is max_user_watches.
You can check the current value with:
To adjust this value – first stop the lsyncd daemon process:
Issue the following command to change the current running value in the kernel:
And then restart the lsyncd process:
Then check the log again and make sure the previous error is no longer showing up. In which case the synchronisation should begin.
The change this permanently, run something like this:
The above command sets the current kernel value as well as update the configuration file. We also force sysctl to reload the configuration for good measure.